|
Strip & Splice Method Complete
Although most tinters today use the one-piece installation method, the original rear window technique is the strip or seamed method where multiple strips of film are utilized. Even though the strip method is more time consuming than a fast "one piece", you can waste hours and film trying to heat shrink a window that you have not yet mastered.
If you learn this technique, you will be able to tint any car, anywhere, with or without electrical power, and without heat shrinking. The strip method is also a fallback procedure in case you only have smaller rolls to work with.
Tools Needed:
Spray bottle with cleaning solution, Olfa knife, Hard card, Paper towels, Squeegee, White pad, Toothbrush and Heat gun
Inspect and Clean Window
Before beginning, it is very important to inspect and clean the window. This will help prevent contamination and other possible film installation problems.
Your initial steps include:
• Checking for scratches and chips on rear window.
• Making sure inside rear panel and brake lights are in good condition.
• Spray outside of window with solution and squeegee clean. Scrub window with white pad, if needed.
• If rear window has rubber gaskets, check for cracks.
Cut and Trim Film Pattern
Now that you have given the rear window a good inspection and cleaning, it's time to cut the film into strips in order to produce the right pattern to apply.
Make sure measurements are exact so the film can be easily installed.
Please follow these steps:

Step 1 – clean the window first |

Step 2 – place film on glass |

Step 5 – make a cut below the defrost line |

Step 7 – place one pattern above the other |
Step 9 - cut side edges |
|
|
 |
Spray and clean the outside of the rear window with solution to make it easier to move the film around. |
|
|
|
 |
Place the film on the outside of the glass (liner side up) to begin cutting your strips. Cover entire window with film (or pieces of a smaller roll width), leaving at least 2" excess film around the window. You'll be making overlapping strips across the window, so be sure to allocate enough film. If you are using a smaller roll of film, be sure to lay the pieces across the window overlapping each piece of film by at least 2". |
|
|
|
 |
Make sure the liner is facing up, away from the glass so it will be against the glass when you install it. Spray the film with solution and carefully squeegee in order to anchor the film to the glass. Rough cut any excess film away leaving a sufficient working border (2" or more). |
|
|
|
 |
Determine the total number of strips needed and appropriate strip size. Every car is different—some vehicles might need two strips, while others may need up to five pieces of film. The best way to figure it out is to look at where the fingers are on the pattern. The object is to gain relief from the fingers so you want to make cuts where the fingers begin finding the corresponding defrost line. |
|
|
|
 |
Find your initial defrost line and make a cut 1/2" below the defrost line all the way across the window. When making this cut, be sure to follow the direction or "curve" of the defrost line. Spray initial strip with solution and carefully anchor it down with your squeegee. Then trim the top and the sides. |
|
|
|
 |
Now take your remaining film pattern and place it 1/2" above the first defrost line. You will now have a 1/2" film overlap above and below the defrost line. Spray area with solution and carefully anchor it down with your squeegee. Trim sides. |
|
|
|
 |
Find your next defrost line and make a cut 1/2" below the defrost line all the way across the window. Spray strip with solution and anchor it down with your squeegee. Take the remaining pattern and place it 1/2" above this second strip creating another 1/2" film overlap. Spray with solution and anchor strip down with your squeegee. Cut sides. |
|
|
|
 |
Repeat this overlap process as necessary depending on the number of defrost line cuts needed. |
|
|
|
 |
If your compound window has rubber gaskets, cut film to edge around the entire window. If your window has a black matrix border around the entire window, make a cut 1/8" larger around the border. Also, look for defrost tabs and trim out tabs on the outside. |
|
|
|
 |
If any fingers are remaining on the film, use the wet shrink method to work them out, but only to the factory edge. |
|
|
|
 |
Starting with the bottom strip, remove film strips from outside of window and place patterns onto clean trimming glass (hard coat touching glass). Place strips in proper order to make it easier upon installation. Trim off any bad edges on film strips. |
|
|
|
Installation Prep
After cutting and trimming your film strips, the next step is to carefully prepare the rear window so a smooth and easy installation can take place.
|
Remove brake light or rear panel if necessary. |
|

Step 1 – remove brake light |
|
If window has rubber gaskets, trim gaskets 1/8" to prevent any light gaps upon installation. |
|
|
Spray inside rear window with solution and scrub with white pad.
Wipe glass clean using a paper towel. Clean rear panel as well. |
|
|
Use toothbrush to clean rubber gaskets or defroster plugs. |
|

Step 4 – use toothbrush to clean defroster plugs |
|
Spray rear window one more time with solution and squeegee out starting at the top and working your way down. Wipe clean using a paper towel. |
|
|
|
|
Window Film Installation
You are now ready to install your film strips onto the inside of the rear window.
Make sure everything is clean and ready to go before following these next steps:

Step 6 – cutting film along defrost line |
Step 7 – remove excess film |
|
|
|
Spray inside of rear window with solution so you can move the film into place. |
|
|
Go to trimming glass and select top of the window strip. Peel film liner back (use tape if necessary) and spray adhesive with solution as you remove liner. |
|
|
Remove film off of trimming glass and carry prepared pattern (overlapping on both arms) to the car. |
|
|
Carefully enter the back seat and place film on the top of the inside rear window. Film should be positioned 1/2" below the initial defrost cut line. Spray strip with solution and squeegee from the top center and working your way down and out. |
|
|
Now, go back to the trimming glass and repeat the removal process on your next strip of film. Place second film strip 1/2" above the initial defrost cut line. Similar to the "Cut & Trim" process, you will now have a 1/2" overlap above and below your defrost line. |
|
|
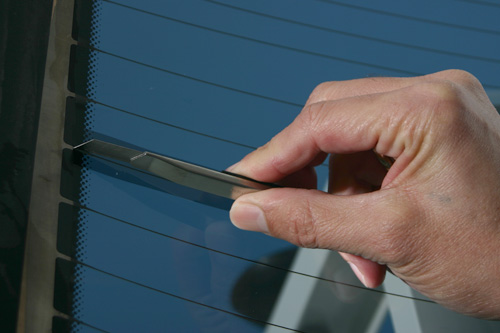
Using a new blade on your Olfa knife, cut film along the defrost line (try to cut on top or bottom of the line if possible to avoid damaging the defrost line itself) all the way across the window. You will have actually have cut two pieces of film since the strips are overlapped. |
|
|
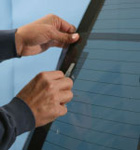
Remove excess film from the second strip of film first. This will be easily removed off of the top. Now, remove the excess film from the first strip of film. Since this excess film is actually below the second strip you will need to lift the second strip and pull excess film out. Make sure you spray this area with solution as you pull off the film. Squeegee out solution from both strips of film. |
|
|
Repeat this overlapping film placement and defrost line cutting on the remaining strips of film. |
|
|
Upon strip installation completion, wrap a paper towel around your squeegee and squeegee the window one more time to remove any remaining fingers. Be extra careful where the strips are connected. |
|
|